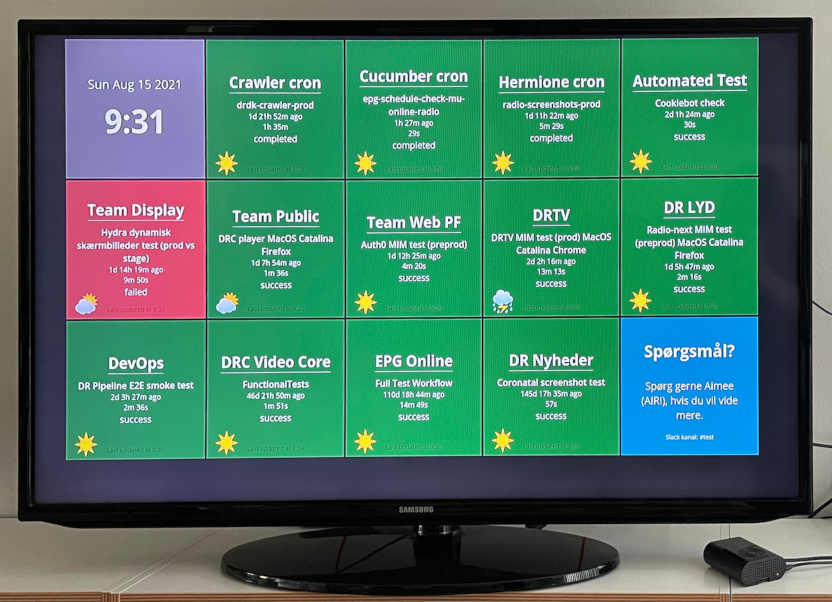
Imagine you have a spare television at work or home, and you want to use it to display some information dashboards. You want it to start in fullscreen mode and automatically loop through a list of tabs. You want this to happen just by turning the television on, and you want control over the tabs without the need for a keyboard or mouse attached. Anyone should be able to configure which tabs are displayed by updating a document in GitHub.
Grab your Raspberry Pi, because we’re about to build a dashboard display!
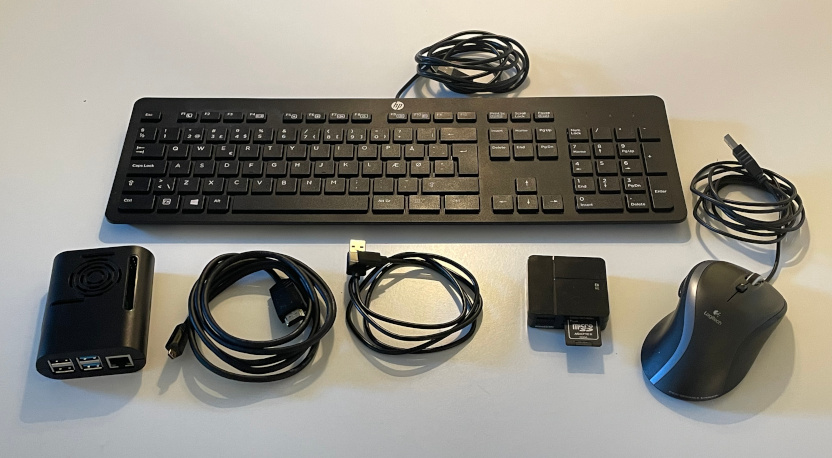
You will need
- A spare television
- A Raspberry Pi 4 (other models will work but generation 4 is silent, has built-in WiFi and supports 4K HDMI output)
- A micro-HDMI to HDMI cable
- A USB to USB-C cable to power the Raspberry Pi from USB output on the television
- A keyboard and mouse to set things up initially
- Possibly: A micro-SD card reader to write a new operating system to SD card
Time required: about 30-45 minutes.
What this tutorial is not
This tutorial assumes you already have some dashboard websites on the internet that you want to display, maybe from Google Analytics, Kibana, Grafana, etc. This tutorial does not cover the creation of such dashboards.
Start with Raspberry Pi OS
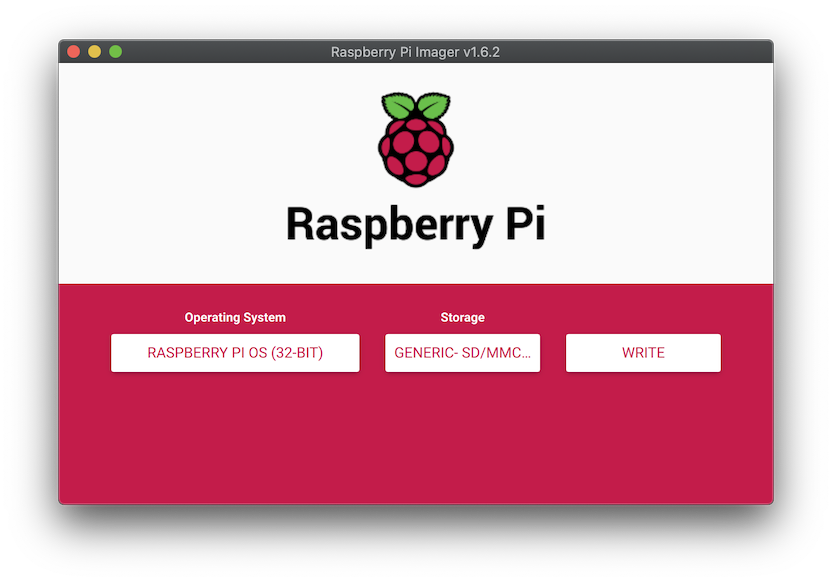
My recommendation is you head to raspberrypi.org and download the latest Raspberry Pi OS imager. If you’ve just bought a new Raspberry Pi, it’s likely it already has an OS installed, so you can skip this step.
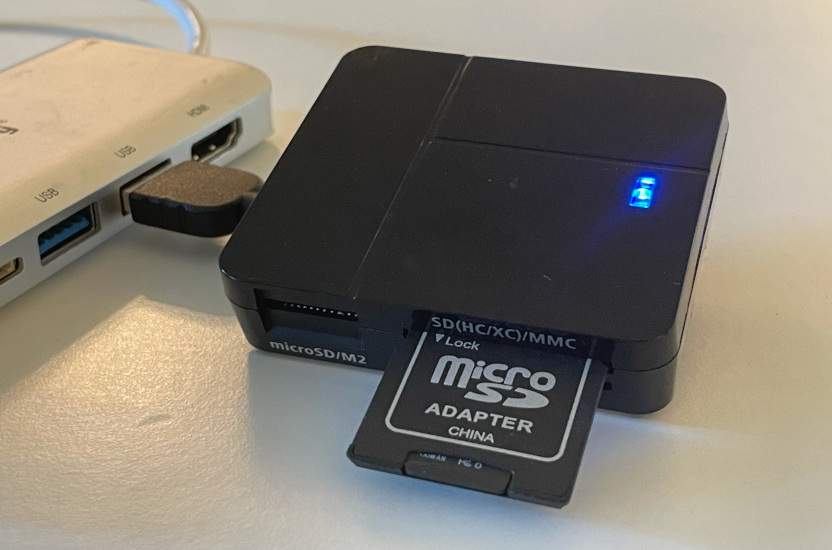
Connect your SD card reader to your computer and go through the imaging process to write Raspberry Pi OS (32-bit) to the micro-SD card.
Initial Raspberry Pi setup
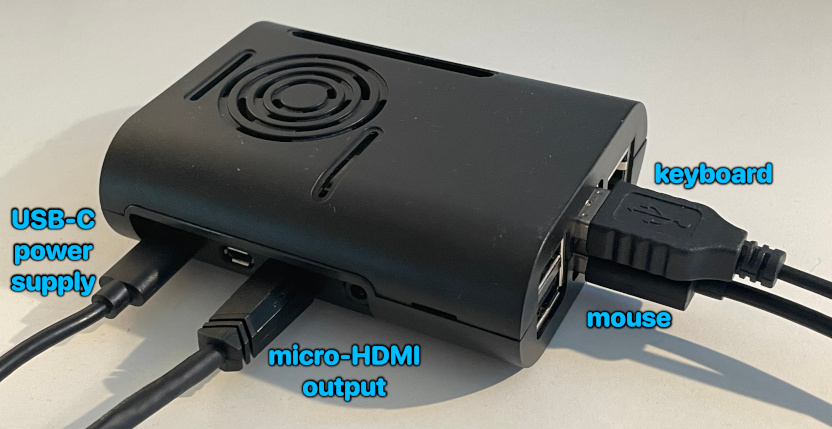
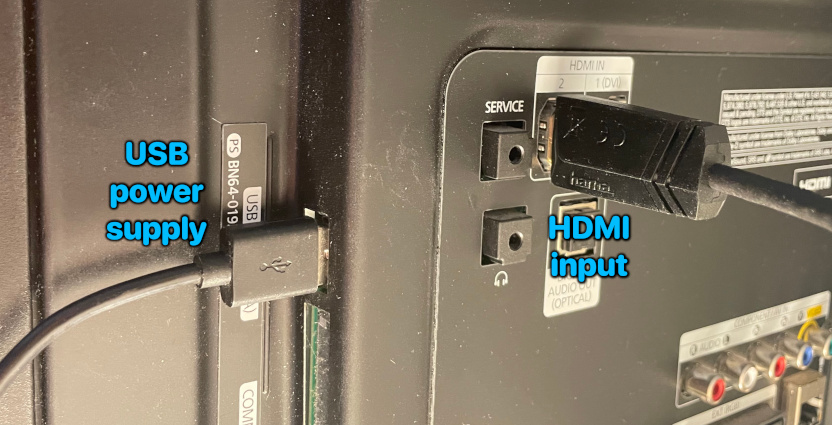
Put the micro-SD card back into your Raspberry Pi. Connect your Raspberry Pi to the television HDMI and USB port, turn on the television, and the Rasbperry Pi should start to boot up. At this point you’ll want to use a keyboard and mouse connected to the Raspberry Pi to set up the initial configuration.
Follow the tutorial to set location, set a password, and connect to a WiFi network. Allow the Raspberry Pi to update software. This can take a few minutes. Now reboot.
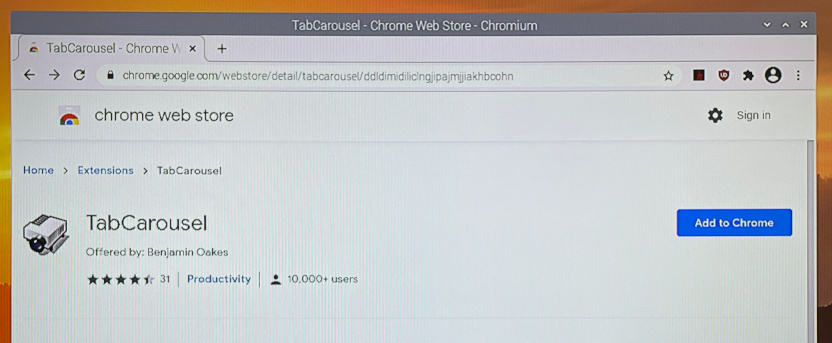
Install TabCarousel plugin for Chromium
Go to the Raspberry Pi menu → Internet → Chromium Web Browser
Search for and install TabCarousel plugin
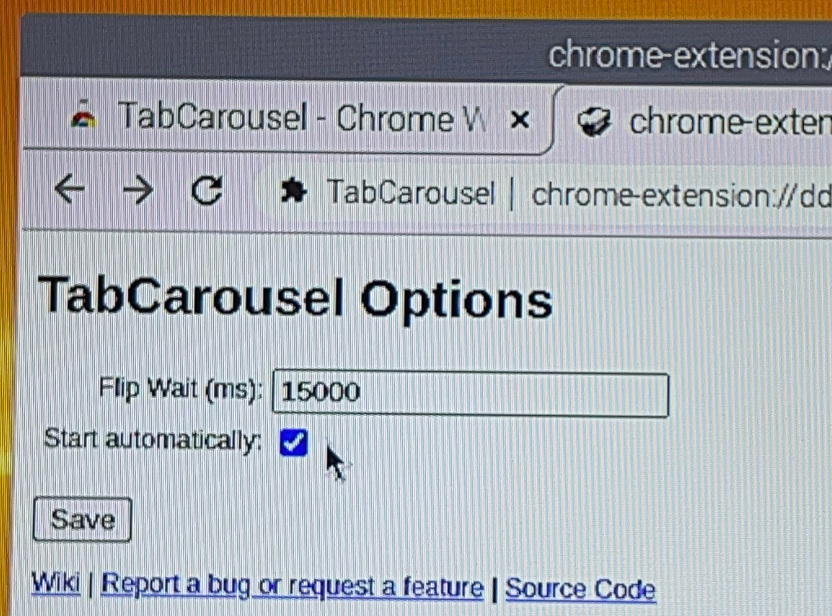
Go to TabCarousel options and set how often you want it to cycle between tabs (15000 ms being every 15 seconds), and set it to start automatically.
Advanced Raspberry Pi setup
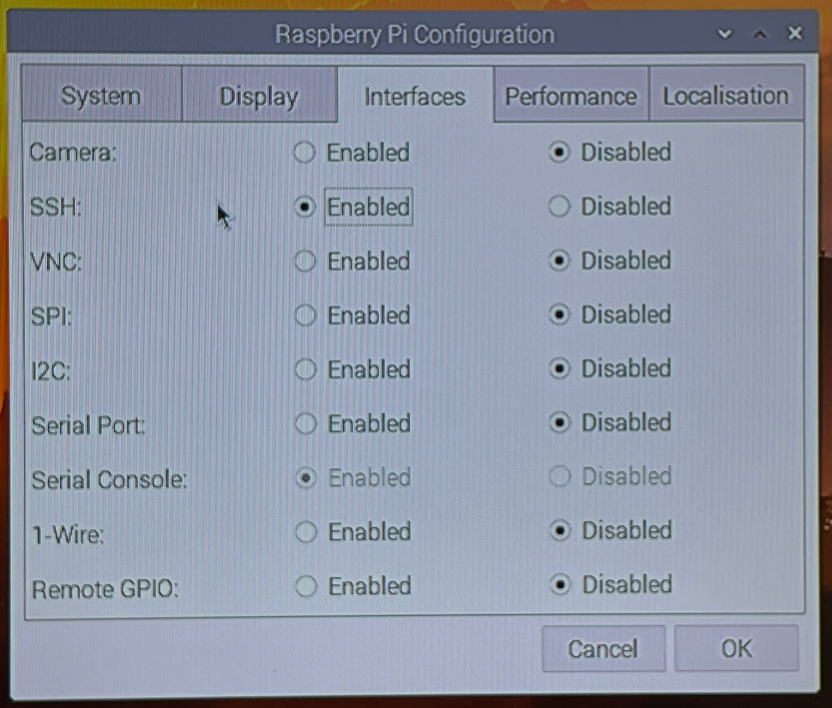
Go to the Raspberry Pi menu → Preferences → Raspberry Pi Configuration
Under System, set a hosthame (I set mine to piboard).
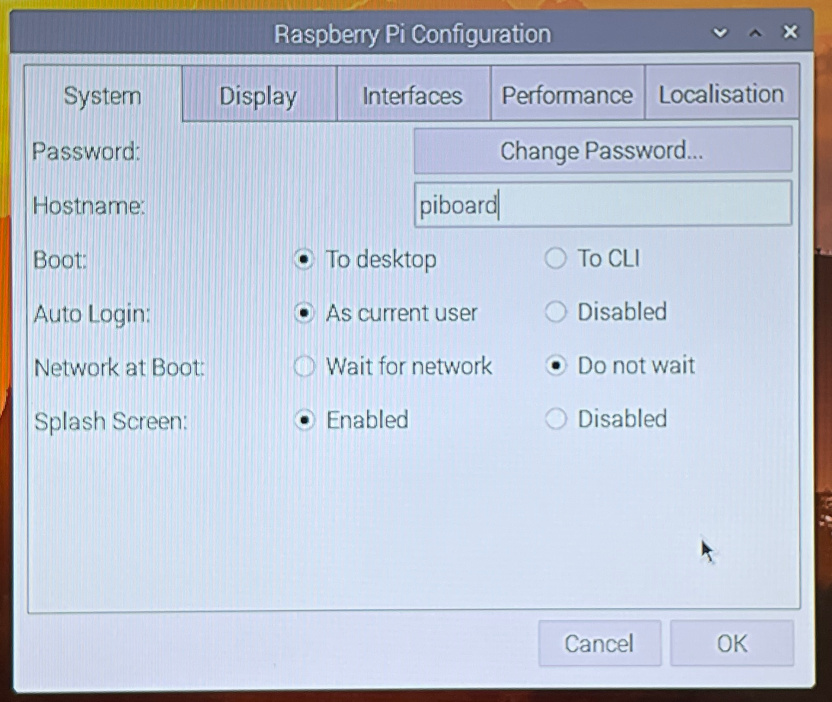
Make sure it is set to boot to desktop, and auto login as current user (it might say As user ‘pi’).
Under Interfaces, enable SSH.
Reboot again.
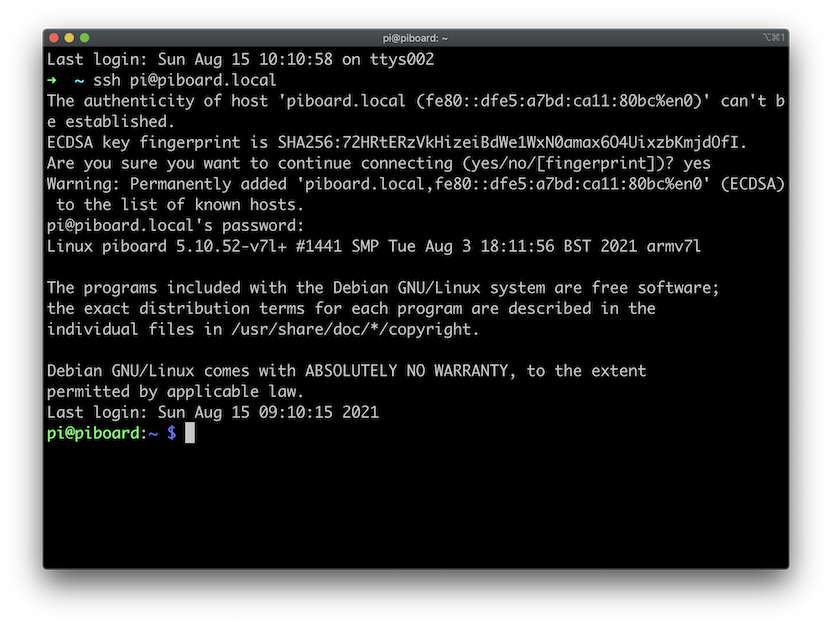
Check SSH access
Of course it is possible to follow this entire tutorial with a keyboard and mouse attached directly to the Raspberry Pi, but if you prefer, you can use to another computer connected to the same WiFi network, and SSH in.
ssh pi@piboard.local
Trust the connection by typing yes and type the password that you configured for the Raspberry Pi, and you will be in!
Disable low voltage warnings
If you see a lightning bolt symbol in the corner of the screen, it’s a warning that your television USB output is not supplying the ideal amount of power to the Raspberry Pi. There is a small risk that the Raspberry Pi could start to behave strangely or corrupt the SD card. If this concerns you, get a proper plug adapter and power your Raspberry Pi from a standard power socket.

In my experience, the risk of corruption is very small, and in the worst case scenario i would just reinstall Raspberry Pi OS and follow this tutorial again. i like the Raspberry Pi being powered by the television because it can be turned on and off just with a TV remote. So i choose to disable the warnings.
If you want to do this, it’s time to start editing a file on the Raspberry Pi. From your SSH terminal (or the terminal program on the Raspberry Pi itself) type:
sudo nano /boot/config.txt
Add the following lines at the end of the file:
# Disable low voltage warning
avoid_warnings=1
Save the file and reboot the Raspberry Pi. This will deal with the lighthing bolt symbol.
You may find you still see a grey warning box.

You can disable this too:
sudo apt-get -y remove lxplug-ptbatt
This change will take effect after another reboot.
Install unclutter
Unclutter is a little program to hide the mouse pointer, to prevent it getting in the way when you don’t need it. We’re going to use this to keep our dashboard lovely and tidy.
sudo apt-get -y install unclutter
Create a links file
Add a text file to a public GitHub repo with the links you want to open:
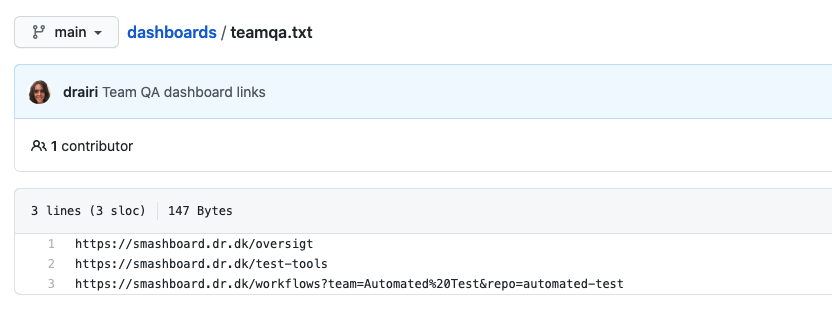
Of course, you could put this file into a private repo if security is a concern, but you would have to work a bit harder with the script that’s going to read it to open the tabs.
Write a script to launch the dashboard
We are going to make a script that reads the list of links and launches them in a fullscreen Chromium.
Create a dashboard.sh file:
sudo nano /home/pi/dashboard.sh
Save this script to the file:
#!/bin/bash

# config options
export ORG=danmarksradio
export REPO=dashboards
export BRANCH=main
export DASHBOARD=teamqa.txt

# don't let this display sleep
export DISPLAY=:0.0
xset s noblank
xset s off
xset -dpms

# hide mouse pointer
unclutter -idle 0.5 -root &

# trick Chromium into believing it shut down successfully last time
sed -i 's/"exited_cleanly":false/"exited_cleanly":true/' /home/pi/.config/chromium/Default/Preferences
sed -i 's/"exit_type":"Crashed"/"exit_type":"Normal"/' /home/pi/.config/chromium/Default/Preferences

# Launch Chromium
/usr/bin/chromium-browser \
  --start-fullscreen \
  --no-first-run \
  --noerrdialogs \
  --disable-infobars \
  $(curl -s "https://raw.githubusercontent.com/${ORG}/${REPO}/${BRANCH}/${DASHBOARD}") &
The config options specify where on GitHub to find the list of links that should be opened when the browser is launched. In my case i’m using organisation danmarksradio, a repository called dashboards, i want to use the main branch, and the filename i want to use is teamqa.txt. You should set these to the values that make sense for you.
The second block sets the display to avoid sleeping, while the third block hides the mouse pointer.
The fourth block stops Chromium from complaining about unclean shutdown. Since at any time we might turn off the television, which will suddenly cut power to the Raspberry Pi, it’s likely that Chromium would get upset if we don’t give it some reassurance.
Lastly, the script launches Chromium with the following options:
--start-fullscreen- makes it fill the whole screen at start up. An alternative mode is--kioskbut this will literally prevent anyone from doing anything else on the Raspberry Pi. I prefer--start-fullscreenbecause it still gives the option to press F11 and come out of fullscreen in case i ever need to do anything else on the Raspberry Pi.--no-first-run- skips first-run checks (i.e. default browser)--noerrdialogs- avoids showing any errors that could interfere with your dashboard experience--disable-infobars- avoids annoying popups about detecting your location etc.
Make this script executable by anyone:
sudo chmod a+x /home/pi/dashboard.sh
Try it out!
/home/pi/dashboard.sh
Within a few seconds, your Raspberry Pi should launch Chromium in fullscreen mode, and show the first of your list of links. After a short period, TabCarousel should automatically move it on to the next.

Congratulations! You now have a dashboard display!
Make it start up automatically
Now we make a service to start the dashboard automatically every time the Raspberry Pi boots up.
Create a dashboard.service file:
sudo nano /etc/systemd/system/dashboard.service
Save this configuration to the file:
[Unit]
Description=Dashboard
After=network.target
After=systemd-user-sessions.service
After=network-online.target
After=graphical.target
Requires=graphical.target
Requires=network-online.target

[Service]
Environment=DISPLAY=:0.0
Environment=XAUTHORITY=/home/pi/.Xauthority
Type=forking
ExecStartPre=/bin/sh -c 'until ping -c1 raw.githubusercontent.com; do sleep 1; done;'
ExecStart=/home/pi/dashboard.sh
Restart=on-abort
User=pi
Group=pi

[Install]
WantedBy=graphical.target
The script tries to wait for the network to be ready, but sometimes this isn’t always successful. The network can be “ready” whilst DNS is still not yet active, for example. This would mean we cannot read the links list from GitHub, so the browser would start with an empty tab. To avoid this, we use ExecStartPre to wait until we can get a response back from GitHub. Then we call the dashboard script that we made just now.
Enable the service to run at boot:
sudo systemctl enable dashboard
That should be it. In theory you can now turn your television off and on again, and your Raspberry Pi will boot up and launch your dashboard display automatically in fullscreen mode, and cycle through the links you wanted.
Debugging problems
To stop the dashboard service from SSH:
sudo systemctl stop dashboard
To start the dashboard service from SSH:
sudo systemctl start dashboard
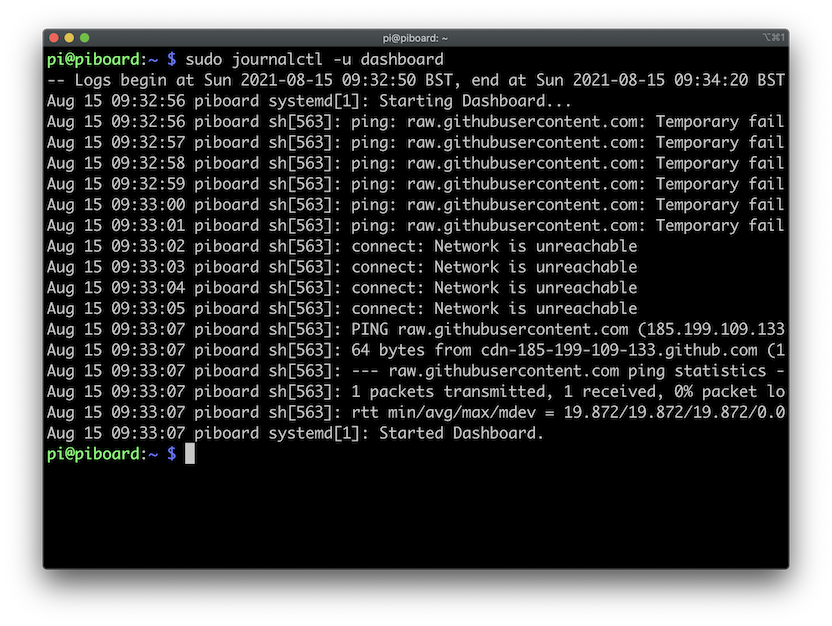
Check the logs to find any issues with the service:
sudo journalctl -u dashboard
If you change the service definition you will need to reload it:
sudo systemctl daemon-reload
Enable emoji in Chromium
The dashboard i’m using uses emoji for part of its information. By default these are not supported by Chromium on Raspberry Pi OS, but you can easily enable them:
sudo apt-get -y install fonts-noto-color-emoji
sudo fc-cache -f -v
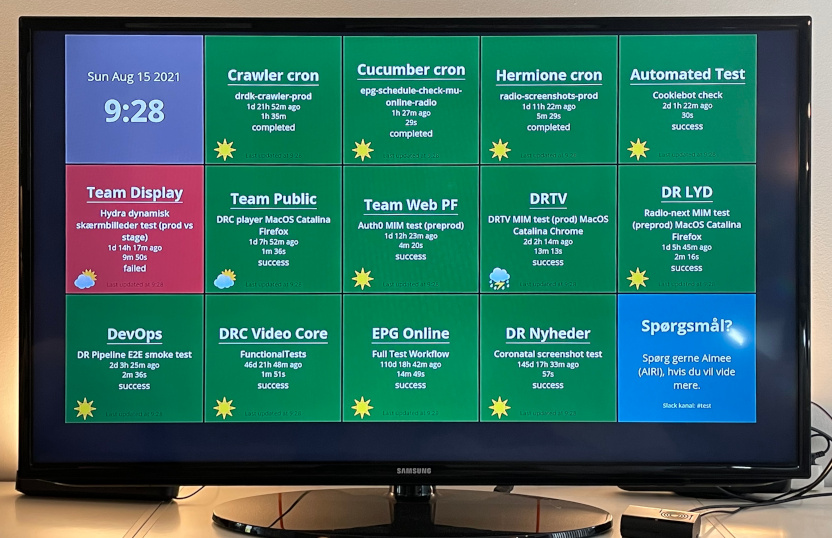
Dashboard now with emoji enabled.
Credits
Thanks to the following sources for a lot of the inspiration that went into this post.